Managing or validation of emails is one of the most important tasks for any modern web application. Whether you are running a blog, an e-commerce store, or a SaaS platform, you need a reliable way to collect and manage user emails. Emails are often used for sending confirmations, newsletters, login credentials, and promotional content.
However, a common problem is that many users enter invalid or fake email addresses. This results in high bounce rates, wasted resources, and reduced email deliverability. To solve this, developers use email verification services that check whether an email address is valid and deliverable.
In this article, we’ll learn how to set up Kickbox email validation in Laravel application using a simple subscriber form as an example. We’ll validate email addresses with Kickbox before saving them to the database.
What is Kickbox?
Kickbox is a popular email validation service that helps businesses ensure that the email addresses they collect are real, valid, and deliverable. It works by checking credibility by using various methods like checking the domain, syntax, and even pinging the mail server to verify if the email really exists.
Why Kickbox is Required?
- Reduces bounce rates by rejecting fake emails.
- Improves sender reputation, so your emails don’t land in spam.
- Saves marketing costs by keeping your email list clean.
- Helps in building trust with accurate user data.
Here, we will take an example scenario where user is subscribing for newsletter and as a developer you are validating email address before allowing to subscribe.
Setting Up Kickbox Account
Before integrating Kickbox into Laravel, we first need to create a Kickbox account. You can sign up using your email or a social login option and fill required details.
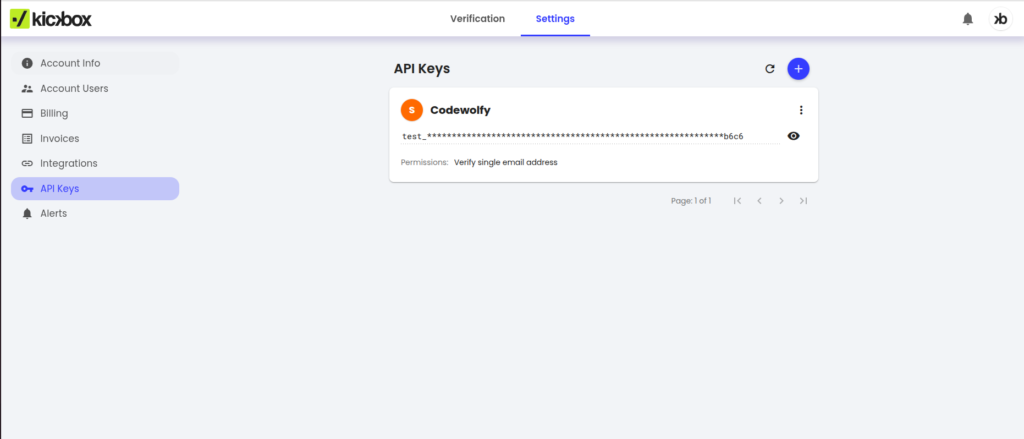
Once the account is created, you need to generate API key. To generate API key, Open this page and create new key for you project.
Kickbox Configuration for Laravel Validation
Once we have API key for kickbox, Now we can move forward with validating email with Kickbox in Laravel. Let’s assume, You have Laravel application up and running.
Add below variable into your environment file:
KICKBOX_API_KEY=your_kickbox_api_key_hereAs common practice for Laravel, let’s use this API key into our config file. For this example, we will add this key into config/service.php. Open config file and add below code.
.
.
'kickbox' => [
    'api_key' => env('KICKBOX_API_KEY')
],
Email Validation of Kickbox
We’ll create a custom validation rule that connects to the Kickbox API and checks whether the given email is valid and deliverable.
Run the following Artisan command in terminal to generate the rule:
php artisan make:rule KickboxEmailThis will create a new file in app/Rules/KickboxEmail.php. Modify it as follows:
<?php
namespace App\Rules;

use Closure;
use Illuminate\Contracts\Validation\ValidationRule;
use Illuminate\Support\Facades\Http;

class KickboxEmail implements ValidationRule
{
    /**
     * Validate the email using Kickbox API.
     *
     * @param  string  $attribute  The field name (e.g., email)
     * @param  mixed   $value      The field value entered by user
     * @param  Closure $fail       Callback to trigger validation failure
     */
    public function validate(string $attribute, mixed $value, Closure $fail): void
    {
        $response = Http::get('https://api.kickbox.com/v2/verify', [
            'email'  => $value,
            'apikey' => config('app.kickbox.api_key'),
        ]);

        $result = $response->json();

        if ($result['result'] !== 'deliverable') {
            $fail("The {$attribute} is not valid or deliverable.");
        }
    }
}
With this rule in place, every time the field is validated, Laravel will call the Kickbox API and only accept the email if it’s marked as deliverable.
Once we implement this validation into any request like subscriber, user registration it will help to prevent dummy users to perform operations. For example :
<?php
namespace App\Http\Controllers;

use App\Models\Subscriber;
use App\Rules\KickboxEmail;
use Illuminate\Http\Request;

class SubscriberController extends Controller
{
    public function store(Request $request)
    {
        $data = $request->validate([
            'email' => ['required', 'email', 'unique:subscribers,email', new KickboxEmail],
        ]);

        Subscriber::create($data);

        return back()->with('success', 'Subscription successful!');
    }
}
Here, we have taken example where user is subscribing newsletter. Once use submit request with their email, it will validate email address using Kickbox and it will allow user to subscribe only when email is valid.
Conclusion
Email validation is about more than formatting. it’s about verifying deliver-ability. By following this streamlined guide, you can easily integrate Kickbox email validation in a Laravel application with clean, focused code.
Looking to explore other options? We’ve also covered ZeroBounce and NeverBounce in separate posts. Check those out if you want a quick comparison or want to try another provider too.