
Environment variables in Laravel manage key configuration like database credentials, API keys, and mail configurations in Laravel. At times, you might be required to edit .env file dynamically in Laravel 12 without physically opening the file every time. This type of approach is used in SaaS applications or multi-tenant applications where settings can vary depending on user inputs or runtime parameters.
For instance, consider your application requires switching API keys for various clients dynamically. By employing a dynamic approach to changing Laravel environment variables, you can tune settings without deploying new code. This will save time, enhance workflow, and make your application more adaptive.
While it’s possible to edit .env file dynamically with many different approaches, it’s generally not recommended unless absolutely necessary. Directly changing environment variables at runtime can lead to mis-configurations if not handled carefully also security thread. Consider it only for controlled scenarios or internal tools.
In this guide, we will show you how to edit .env file dynamically in Laravel application using package. However, you can also do this manually but we suggest to use package for error free integration. This package also provide additional features like allows you to add or edit any environment values with GUI, backup/restore of env file.
Laravel-EnvEditora Package Installation
To make dynamic updates easier, we’ll use the Laravel-EnvEditor
package. This package simplifies editing and managing .env files dynamically. Let’s install the package to integrated env variable value change into your Laravel 12 application. Open your terminal and run the following Composer command to install it.
composer require geosot/laravel-env-editorComposer will handle the installation and downloads all required code files, and thanks to Laravel auto-discovery, the package will be ready to use immediately.
Editing .env Values Dynamically
Once installed, The package makes it simple to change an env variable programmatically. You can add new env configuration or edit existing ones with just a few lines of code.
For example, let’s assume you want to allow user to change email configuration at any point of time.With editing env values, you can simply create an form and when user submit that for with values you can update mail configuration.
<?php

use Illuminate\Http\Request;
use GeoSot\EnvEditor\Facades\EnvEditor;

class SettingsController extends Controller
{
    public function updateSmtpSettings(Request $request)
    {
        EnvEditor::setKey('MAIL_MAILER', $request->input('mail_mailer'));
        EnvEditor::setKey('MAIL_HOST', $request->input('mail_host'));
        EnvEditor::setKey('MAIL_PORT', $request->input('mail_port'));
        EnvEditor::setKey('MAIL_USERNAME', $request->input('mail_username'));
        EnvEditor::setKey('MAIL_PASSWORD', $request->input('mail_password'));
        EnvEditor::setKey('MAIL_FROM_ADDRESS', $request->input('mail_from_address'));
        EnvEditor::setKey('MAIL_FROM_NAME', $request->input('mail_from_name'));

        EnvEditor::save();

        return redirect()->back()->with('success', 'SMTP settings updated successfully!');
    }
}
In this example, we first set the required smtp value using EnvEditor::setKey(). The EnvEditor::save() method writes these changes directly to your .env file. You can add validation and all for security purpose but here we have kept example simple.
The package also provide add method to add value to environment file on fly. Let’s take an small example to check how add works.
<?php

use GeoSot\EnvEditor\Facades\EnvEditor;

class SettingsController extends Controller
{
    public function addNewApiKey()
    {
        EnvEditor::setKey('GOOGLE_MAPS_API_KEY', 'your-new-api-key-goes-here');
        EnvEditor::save();

        return 'New API key added successfully!';
    }
}
Here with set method it will google maps API key to env configuration.
Editing .env File with GUI
For those who prefer a visual interface, the package provides built-in GUI. This feature provides a fully functional and secure web pages where you can view, edit, and add environment variables without writing any code.
To enable this feature, first publish the package’s configuration file.
php artisan vendor:publish --provider="GeoSot\EnvEditor\ServiceProvider" --tag="config"Next, open the config/env-editor.php file and enable the routes.
<?php

return [
    'paths' => [
        'backupDirectory' => storage_path('env-editor'),
    ],

    'route' => [
        'enable' => true,
        // Prefix url for route Group
        'prefix' => 'env-editor',
        // Routes base name
        'name' => 'env-editor',
        // Middleware(s) applied on route Group
        'middleware' => ['web'],
    ],

    'timeFormat' => 'd/m/Y H:i:s',

    'layout' => 'env-editor::layout',
];
Here, you have to change enable to true and you can also customize the prefix or slug. This prefix specifies URL for accessing env editing pages. For security purpose, it also allows to add middleware. Into middleware array, you can add your middleware to provide access to admin users and block access for other users. Since, env values are core configuration for any Laravel application we suggest to use proper security if you are enabling this feature.
Now, just visit the /env-editor URL in your browser. You will see a clean interface listing all your current .env variables, allowing you to make changes and save them with the click of a button.
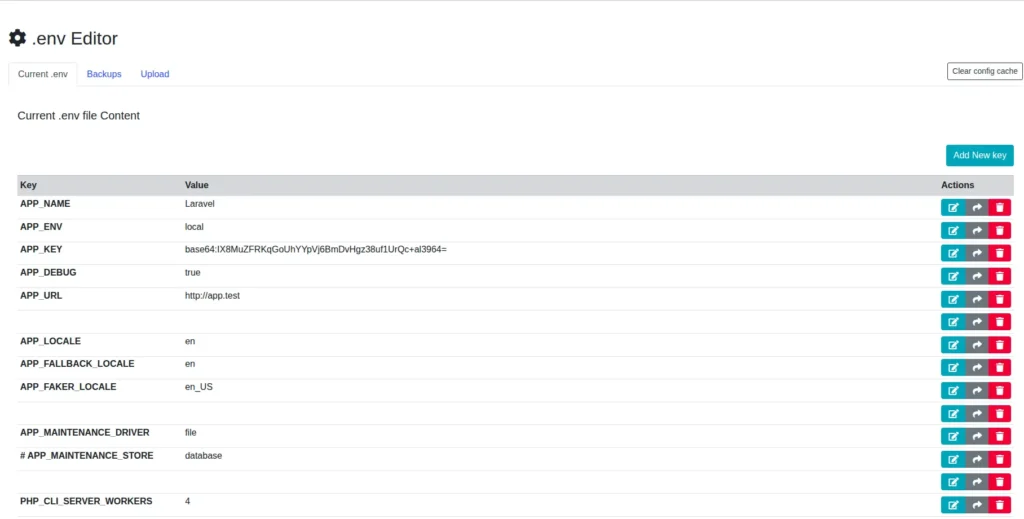
As you can see in above screenshot, it also provides back up and restore feature for .env file. Here you can create a backup for your current environment file. Into upload section you can migrate any existing environment file into your current Laravel 12 application.
Conclusion
Learning how to dynamically edit .env file in Laravel 12 offers flexibility in handling environment variables and changing configurations during runtime. With the Laravel-EnvEditor package, you can dynamically change Laravel environment variables, provide instant updates, and even handle values with a graphical user interface while backup options are readily available.
Similar to this tool, if you spend time creating custom Artisan commands, you might want to make their output more readable and interactive. To take your command-line scripts to the next level with colors and styling, we recommend you to checkout our guide: Enhance PHP Command-Line Tools with AnsiKit.