Laravel Google Login Using Socialite makes it simple to integrate Google authentication into your application. Nowadays, most users prefer logging in with social accounts like Google, Facebook, Twitter, or GitHub instead of filling out lengthy sign-up forms. By using Socialite in Laravel, you can allow users to log in quickly with their Google account, avoid password management hassles, and deliver a smoother user experience.
In this tutorial, we will guide you to integrate Google login to your application step by step.
For Google login integration in Laravel, you need to go to Google Developer Console and set up the Google app. It will give you the client ID and secret and also need to set up an entry point and redirect for our application.
Setting up a Google Account/App For Login with Google
Perform the below steps to create Google app and get credentials.
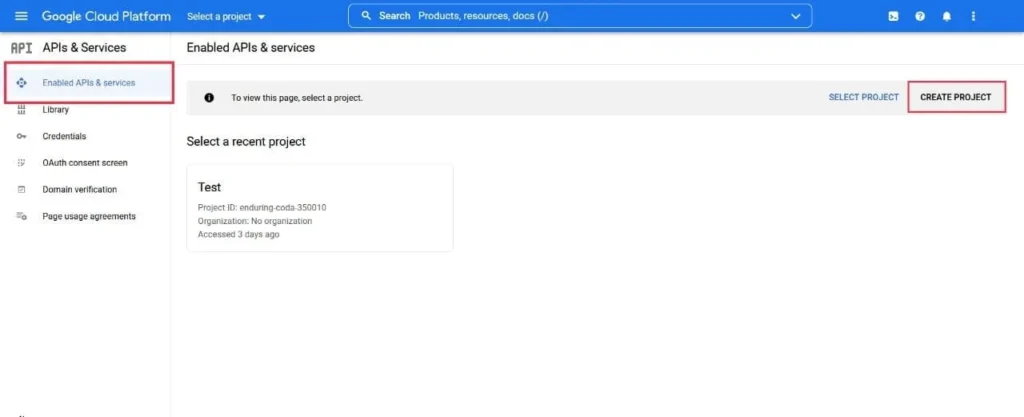
Step 1: Open Google Developer Console and log in to your Google account.
Step 2: At home page, you’ll find the option to Create Project. Use it to set up a new Google app or project.
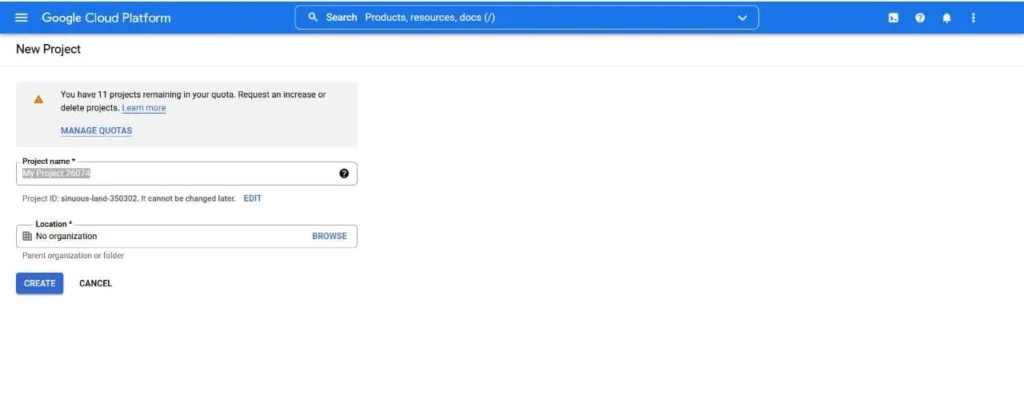
Step 3: A view similar to the image below will appear. Fill in all details and click the create button to finalize your new project.
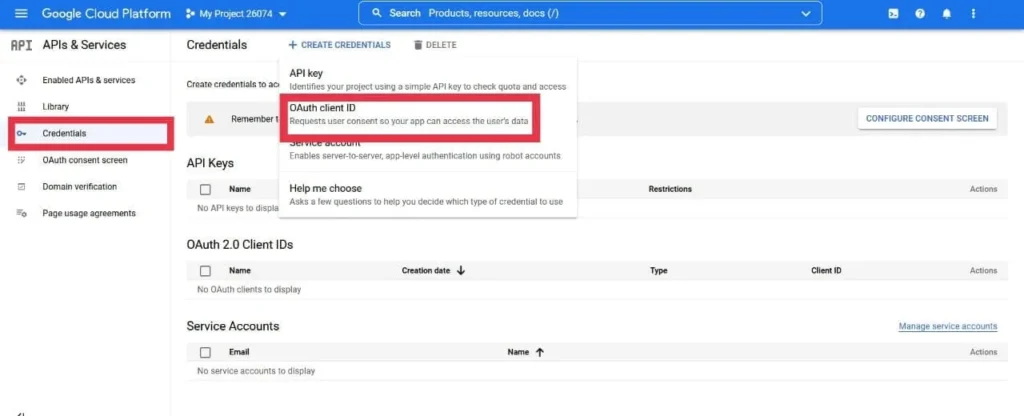
Step 4: After that, you need to click on the left-side menu credentials and appear below the screen. In this screen, you need to select OAuth client ID:
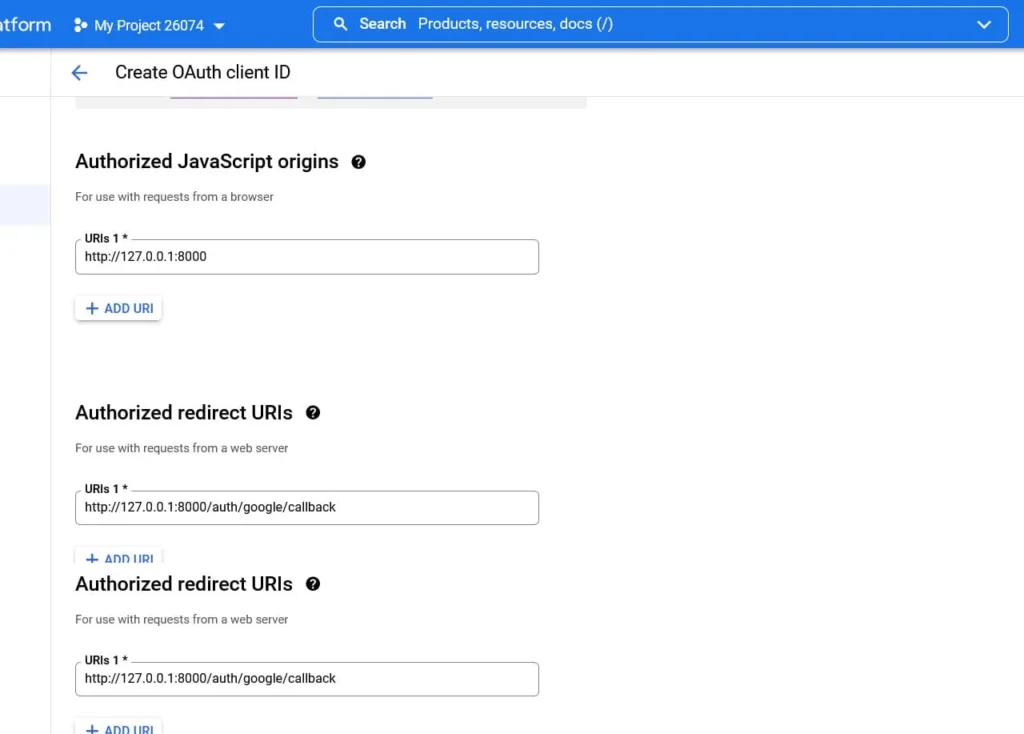
Step 5: After that, the below form will appear. Here From different Application type options select Web application. Once you have selected the Web application option, then one form will appear on the web page. It will ask you for some details like name, authorized URLS, and Redirect URL set appropriate values and click on the save button
Step 6: The next screen will be the listing screen. The OAuth2 Client ID table will display the newly created Oauth Client ID. Now click on the download button and it will download data into a JSON file.

That JSON file contains the necessary values for setting Laravel login with Google or Gmail. We will use that in further code.
For this example, we will use Laravel Socialite as a support library.
- Install Laravel Application
- Install Jetstream
- Database Configuration
- Setting Up a Google Account in Our Application
- Install Socialite
- User Model Changes
- Create Necessary Routes
- Authentication Functionality
- Create Views
- Running Application
Create a new Laravel Application
Let’s start with creating a fresh Laravel application for this example. If you already have an existing application then you can skip this step. As you know you can create a new Laravel application with composer using one of the below commands. So open your terminal and enter the below command :
laravel new GoogleLogin
//Or
composer create-project --prefer-dist laravel/laravel GoogleLogin
Here we are using “GoogleLogin” as the project name but you can rename it.
Install Jetstream
Laravel Jetstream provides the application’s login, registration, email verification, two-factor authentication, session management, API via Laravel Sanctum, and optional team management features in short all authentication and authorization features are provided with Jetstream. However, you can customize those components as per your requirements.
Please check to Create a Laravel Application with Jetstream Authentication for complete step-by-step installation.
Let’s install Jetstream using Composer. Enter the below command to the terminal or command prompt to install Jetstream :
composer require laravel/jetstreamIt will download Laravel Jetstream to our newly created application.
Jetstream provides two front-end stacks. Which are Livewire and Inertia. In this example, we will use livewire as frontend. Below command will install Jetstream with Livewire.
php artisan jetstream:install livewireAfter installation, we need to install node packages for liveware. Enter the below commands to install & compile npm packages :
npm install
npm run dev
It will take some time to download and install node modules. After that, it will show the Laravel mix build successfully.
Database Configuration
Now it’s time to configure a database for our application. If you don’t have a database then create a new one. After that open your project in a text editor and open the .env file from the root directory. If the .env file is missing then copy the .env.example and rename it.
DB_CONNECTION=mysql
DB_HOST=127.0.0.1
DB_PORT=3306
DB_DATABASE=**********
DB_USERNAME=*********
DB_PASSWORD=*********
After database configuration, migrate the database using the below command :
php artisan migrateIt will create database tables from migration files.
Setting Up a Google Account in Our Application
Now our initial application setup is completed. We need to set up Google’s secret, and client ID, and redirect the URL to our application. So once again open the .env file and add the below code at last.
GOOGLE_CLIENT_ID = "Your Client ID"
GOOGLE_CLIENT_SECRET = "Your client secret"
GOOGLE_REDIRECT = "http://127.0.0.1:8000/auth/google/callback" //redirect
Install Socialite
As we know we will use the Laravel Socialite package to perform Google authentication. Open your terminal and enter the below command to download and install the Socialite package :
composer require laravel/socialiteAfter that, configure this package in the app.php file, so go to the config directory and open the app.php file. we need to add Socialite as the provider and alias :
'providers' => [
    .
    .
    .
    Laravel\Socialite\SocialiteServiceProvider::class,
],

'aliases' => [
    .
    .
    .
    'Socialite' => Laravel\Socialite\Facades\Socialite::class,
]
The Socialite package works as a service in our application so we need to configure it into our configuration file for services. For that, open the App\Config\services.php file and make the below changes
<?php

return [

    'mailgun' => [
        'domain' => env('MAILGUN_DOMAIN'),
        'secret' => env('MAILGUN_SECRET'),
        'endpoint' => env('MAILGUN_ENDPOINT', 'api.mailgun.net'),
    ],

    'postmark' => [
        'token' => env('POSTMARK_TOKEN'),
    ],

    'ses' => [
        'key' => env('AWS_ACCESS_KEY_ID'),
        'secret' => env('AWS_SECRET_ACCESS_KEY'),
        'region' => env('AWS_DEFAULT_REGION', 'us-east-1'),
    ],

    //Add this code
    'google' => [
        'client_id'     => env('GOOGLE_CLIENT_ID'),
        'client_secret' => env('GOOGLE_CLIENT_SECRET'),
        'redirect'      => env('GOOGLE_REDIRECT')
    ],
];
User Model & Migration Changes
Now, We will modify the user database table for storing google_id. For that, we need to change into user migration and model. Let’s create migration using the below command :
php artisan make:migration add_google_id_column_to_userIt will create databas/migrations/_add_google_id_column_to_user.php file. Let’s modify it as per our requirements.
<?php

use Illuminate\Database\Migrations\Migration;
use Illuminate\Database\Schema\Blueprint;
use Illuminate\Support\Facades\Schema;

class AddGoogleIdColumnToUser extends Migration
{
    public function up()
    {
        Schema::table('users', function (Blueprint $table) {
            $table->string('google_id')->nullable();
        });
    }

    public function down()
    {
        Schema::table('users', function (Blueprint $table) {
            $table->dropColumn('google_id');
        });
    }
}
Open App\Models\User.php and add the google_id column to the fillable array for mass assignment.
protected $fillable = [
    'name',
    'email',
    'password',
    'google_id',//Add this line
];
Let’s add a Google column to the user’s table by migrating the database. Open the terminal and enter the below command :
php artisan migrateCreate Necessary Routes
Let’s add a route for Google login and redirect into our application. Open the routes\web.php file and make the below changes.
<?php

use App\Http\Controllers\GoogleController;
use Illuminate\Support\Facades\Route;

Route::get('/', function () {
    return view('welcome');
});

Route::middleware([
    'auth:sanctum',
    config('jetstream.auth_session'),
    'verified'
])->group(function () {
    Route::get('/dashboard', function () {
        return view('dashboard');
    })->name('dashboard');
});

Route::get('auth/google', [GoogleController::class, 'redirectToGoogle']);
Route::get('auth/google/callback', [GoogleController::class, 'handleGoogleCallback']);
Here we added 2 routes in our application. The first one will redirect to the Google login page and the second one will handle the Google login response. Please create those routes as per your Google account like if you changed the URL path into your Google console ID then it can show a 404 Error. So please compare it with Google’s Authorized JavaScript Origins and Authorized redirect URLs in Google Console.
Authentication Functionality
Let’s create functionality that will handle operations as per our routing. It’s a best practice to create controllers functionality-wise separately. In this application, we will create a new controller called Google Controller to handle all Google authentication operations.
Switch back to the terminal and enter the below command to create a Google Controller :
php artisan make:controller GoogleControllerIt will create GoogleController.php. Let’s modify it as per our requirements.
<?php

namespace App\Http\Controllers;

use Illuminate\Http\Request;
use Laravel\Socialite\Facades\Socialite;
use App\Models\User;
use Exception;
use Auth;

class GoogleController extends Controller
{
    /**
     * Create a new controller instance.
     *
     * @return void
     */
    public function redirectToGoogle()
    {
        return Socialite::driver('google')->redirect();
    }

    /**
     * Create a new controller instance.
     *
     * @return void
     */

    public function handleGoogleCallback()
    {
        try {
            $googleUser = Socialite::driver('google')->user();
            $user = User::where('google_id', $googleUser->id)->first();
            if(!$user){
                $user = User::create([
                    'name' => $googleUser->name,
                    'email' => $googleUser->email,
                    'google_id'=> $googleUser->id,
                    'password' => encrypt('12345678')
                ]);
            }
            Auth::login($user);
            return redirect()->intended('dashboard');
        } catch (Exception $e) {
            dd($e->getMessage());
        }
    }
}
Here we have created 2 methods that will handle operations as per routes. The first method will redirect Google login page and in the second method we will check the login status. If a user logs in then we will check the user into our database and add if a user is not found.
Create Views
We have used Jetstream authentication so auth views are already created. So we don’t have to create new views. we can easily modify it as per our requirements. Open resources\views\auth\login.blade.php file and modify it :
<x-guest-layout>
    <x-jet-authentication-card>
        <x-slot name="logo">
            <x-jet-authentication-card-logo />
        </x-slot>

        <x-jet-validation-errors class="mb-4" />

        @if (session('status'))
            <div class="mb-4 font-medium text-sm text-green-600">
                {{ session('status') }}
            </div>
        @endif

        <form method="POST" action="{{ route('login') }}">
            @csrf

            <div>
                <x-jet-label for="email" value="{{ __('Email') }}" />
                <x-jet-input id="email" class="block mt-1 w-full" type="email" name="email" :value="old('email')" required autofocus />
            </div>

            <div class="mt-4">
                <x-jet-label for="password" value="{{ __('Password') }}" />
                <x-jet-input id="password" class="block mt-1 w-full" type="password" name="password" required autocomplete="current-password" />
            </div>

            <div class="block mt-4">
                <label for="remember_me" class="flex items-center">
                    <x-jet-checkbox id="remember_me" name="remember" />
                    <span class="ml-2 text-sm text-gray-600">{{ __('Remember me') }}</span>
                </label>
            </div>

            <div class="flex items-center justify-end mt-4">
                @if (Route::has('password.request'))
                    <a class="underline text-sm text-gray-600 hover:text-gray-900" href="{{ route('password.request') }}">
                        {{ __('Forgot your password?') }}
                    </a>
                @endif

                <x-jet-button class="ml-4">
                    {{ __('Log in') }}
                </x-jet-button>
            </div>
            <div class="flex items-center justify-end mt-4">
                <a href="{{ url('auth/google') }}">
                    <img src="https://developers.google.com/identity/images/btn_google_signin_dark_normal_web.png" style="margin-left: 3em;">
                </a>
            </div>
        </form>
    </x-jet-authentication-card>
</x-guest-layout>
Running Application
Now our application is compatible with Google login. For running the application run the local server using artisan. Open the terminal and enter the below command to run the Laravel application :
php artisan serveOpen the below URL in the browser to see the output:
http://127.0.0.1:8000Conclusion
This guide explains how to set up Gmail SMTP, configure your Google account, create a Mailable class, build a controller, and set up views and routes. By following these steps, you can send emails in Laravel using Google Mail with reliable delivery and a clean project structure.
While setting up Laravel Google Login Using Socialite, you may also want to explore how to handle communication with users through email. For that, check out our guide on Send Emails in Laravel Using Google Mail, where we cover the complete setup for integrating Gmail with your Laravel project.