Building a reliable and developer-friendly API requires proper documentation that helps others understand and test your endpoints. Laravel API Documentation using Swagger makes this process smooth and professional. Swagger allows you to create interactive API docs that not only explain your endpoints but also let users execute them directly from the browser.
Whether you’re creating an e-commerce backend, mobile app API, or internal microservice, Laravel API Documentation using Swagger will save time and reduce confusion during development.
What is Swagger
Swagger, now known as the OpenAPI Specification, is a powerful framework for designing, building, and documenting RESTful APIs. It allows developers to define endpoints, request/response formats, and authentication details in a standardized way. Using Swagger, teams can easily visualize their APIs through an interactive interface that acts like a live playground.
Swagger integrates seamlessly with Laravel, helping developers automatically generate documentation from annotations in controller files.
Why Choose Swagger Over Other Alternatives
- Interactive Testing Interface
- Auto-Generated Documentation
- OpenAPI Standard
- Improved Collaboration
- Error Reduction
Swagger Package Installation
Start by installing the Swagger-PHP and L5-Swagger packages that work perfectly with Laravel 12. You will use composer to install swagger package. Open your terminal and enter below command:
composer require "darkaonline/l5-swagger"Once the package is installed, publish the configuration file using the Artisan command:
php artisan vendor:publish --provider "L5Swagger\L5SwaggerServiceProvider"This command creates a config/l5-swagger.php file. You can customize it later if needed.
Next thing you need to configure is documentation URL. Open your .env file and add the Swagger documentation URL:
L5_SWAGGER_GENERATE_ALWAYS=true
L5_SWAGGER_CONST_HOST=http://127.0.0.1:8000
Generate API for Posts
We will see just two endpoints for this example to keep things simple, but you can explore the complete CRUD operations for this Posts API, including its model, migration, and authentication setup in our detailed guide “Creating Laravel REST API Using Passport Authentication“.
First, add below routes into routes/api.php:
use App\Http\Controllers\Api\PostController;

Route::get('posts', [PostController::class, 'index']);
Route::get('posts/{id}', [PostController::class, 'show']);
Route::post('posts', [PostController::class, 'store']);
Now, let’s modify our controller to return response for these routes. Open or create PostController and modify as below:
<?php

namespace App\Http\Controllers\Api;

use App\Http\Controllers\Controller;
use Illuminate\Http\Request;
use App\Models\Post;

class PostController extends Controller
{
    public function index()
    {
        $posts = auth()->user()->posts;

        return response()->json([
            'success' => true,
            'data' => $posts
        ]);
    }

    public function show($id)
    {
        $post = auth()->user()->posts()->find($id);

        if (!$post) {
            return response()->json([
                'success' => false,
                'message' => 'Post not found'
            ], 400);
        }

        return response()->json([
            'success' => true,
            'data' => $post->toArray()
        ], 400);
    }

    public function store(Request $request)
    {
        $this->validate($request, [
            'title' => 'required',
            'description' => 'required'
        ]);

        $post = new Post();
        $post->title = $request->title;
        $post->description = $request->description;

        if (auth()->user()->posts()->save($post))
            return response()->json([
                'success' => true,
                'data' => $post->toArray()
            ]);
        else
            return response()->json([
                'success' => false,
                'message' => 'Something went wrong. Please Try Again'
            ], 500);
    }
}
As you can see, This controller has three methods one is for listing all posts, another for returning single post’s data and last one is to create an new post. Before generating API documentation, you need to add swagger annotations.
Generate Swagger Annotations
Now that your API is ready, it’s time to add Swagger annotations so that the documentation can be generated automatically.
Open PostController.php and modify it as follows:
<?php

namespace App\Http\Controllers\Api;

use App\Http\Controllers\Controller;
use Illuminate\Http\Request;
use App\Models\Post;

/**
 * @OA\Info(
 *     title="Laravel API Documentation using Swagger",
 *     version="1.0.0",
 *     description="Interactive documentation for Laravel Posts API using Swagger"
 * )
 *
 * @OA\Tag(
 *     name="Posts",
 *     description="Endpoints for managing posts in Laravel API Documentation using Swagger"
 * )
 */
class PostController extends Controller
{
    /**
     * @OA\Get(
     *     path="/api/posts",
     *     tags={"Posts"},
     *     summary="Get all posts",
     *     description="Retrieve all posts using Laravel API Documentation with Swagger.",
     *     @OA\Response(
     *         response=200,
     *         description="Successful response - list of posts",
     *         @OA\JsonContent(
     *             @OA\Property(property="success", type="boolean", example=true),
     *             @OA\Property(property="data", type="array",
     *                 @OA\Items(
     *                     @OA\Property(property="id", type="integer", example=1),
     *                     @OA\Property(property="title", type="string", example="First Post"),
     *                     @OA\Property(property="description", type="string", example="This is a sample post description")
     *                 )
     *             )
     *         )
     *     )
     * )
     */
    public function index()
    {
        $posts = Post::all();

        return response()->json([
            'success' => true,
            'data' => $posts
        ]);
    }

    /**
     * @OA\Get(
     *     path="/api/posts/{id}",
     *     tags={"Posts"},
     *     summary="Get a single post by ID",
     *     description="Retrieve a specific post by its ID using Laravel API Documentation with Swagger.",
     *     @OA\Parameter(
     *         name="id",
     *         in="path",
     *         required=true,
     *         description="ID of the post to retrieve",
     *         @OA\Schema(type="integer", example=1)
     *     ),
     *     @OA\Response(
     *         response=200,
     *         description="Post found successfully",
     *         @OA\JsonContent(
     *             @OA\Property(property="success", type="boolean", example=true),
     *             @OA\Property(property="data", type="object",
     *                 @OA\Property(property="id", type="integer", example=1),
     *                 @OA\Property(property="title", type="string", example="First Post"),
     *                 @OA\Property(property="description", type="string", example="This is a sample post description")
     *             )
     *         )
     *     ),
     *     @OA\Response(response=400, description="Post not found")
     * )
     */
    public function show($id)
    {
        $post = Post::find($id);

        if (!$post) {
            return response()->json([
                'success' => false,
                'message' => 'Post not found'
            ], 400);
        }

        return response()->json([
            'success' => true,
            'data' => $post->toArray()
        ]);
    }

    /**
     * @OA\Post(
     *     path="/api/posts",
     *     tags={"Posts"},
     *     summary="Create a new post",
     *     description="Store a new post record using Laravel API Documentation with Swagger.",
     *     @OA\RequestBody(
     *         required=true,
     *         @OA\JsonContent(
     *             required={"title","description"},
     *             @OA\Property(property="title", type="string", example="My New Post"),
     *             @OA\Property(property="description", type="string", example="This is a description for the new post")
     *         )
     *     ),
     *     @OA\Response(
     *         response=200,
     *         description="Post created successfully",
     *         @OA\JsonContent(
     *             @OA\Property(property="success", type="boolean", example=true),
     *             @OA\Property(property="data", type="object",
     *                 @OA\Property(property="id", type="integer", example=3),
     *                 @OA\Property(property="title", type="string", example="My New Post"),
     *                 @OA\Property(property="description", type="string", example="This is a description for the new post")
     *             )
     *         )
     *     ),
     *     @OA\Response(response=400, description="Validation error"),
     *     @OA\Response(response=500, description="Server error")
     * )
     */
    public function store(Request $request)
    {
        $this->validate($request, [
            'title' => 'required',
            'description' => 'required'
        ]);

        $post = new Post();
        $post->title = $request->title;
        $post->description = $request->description;

        if ($post->save())
            return response()->json([
                'success' => true,
                'data' => $post->toArray()
            ]);
        else
            return response()->json([
                'success' => false,
                'message' => 'Something went wrong. Please Try Again'
            ], 500);
    }
}
Generate Swagger Documentation
After defining annotations, you are ready to generate API documentation using Swagger into your Laravel application. Open your terminal and enter below command to generate API docs:
php artisan l5-swagger:generateOnce generated, you can view your API documentation by visiting this URL:
http://127.0.0.1:8000/api/documentationIt will show webpage something like below image.
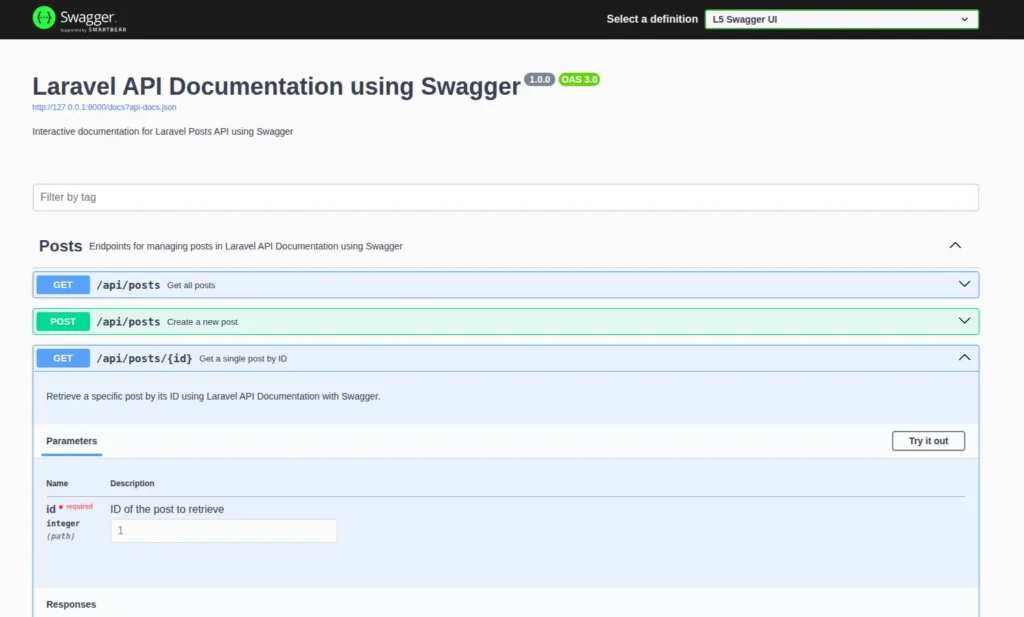
You’ll now see a clean, interactive UI where all your endpoints are listed. You can try out each endpoint directly and see responses instantly. Laravel API Documentation using Swagger provides clarity and convenience, improving the developer experience and collaboration process.
Conclusion
Laravel API Documentation using Swagger offers an efficient way to document and test APIs interactively. It helps teams maintain consistency, reduces errors, and accelerates development cycles.